Android
How to Customize the Galaxy S9 Notification Bar
In this guide we’ll explain how to customize the Galaxy S9 notification bar and why you might want to. By changing the notification bar you can easily and quickly access some of the features you use the most. Including turning on WiFi, using night mode, connecting to Bluetooth speakers, and other helpful controls.
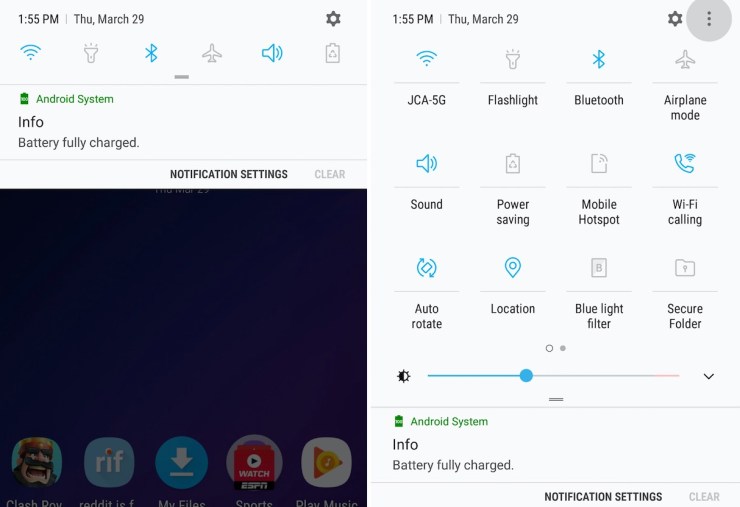
When you swipe down from the top of the screen you’ll see some Quick Setting controls and recent notifications. Swipe down a second time and you’ll get an expanded view of your entire notification bar.
Read: How to Disable the Galaxy S9 Always-On Display
Everything in here is fully customizable, allowing you to do more with your phone. So, instead of fumbling through the settings menu on your phone, change it to fit your personal needs.
How to Customize the Galaxy S9 Notification Bar
To start, check out our hands-on video above. It’s from the Galaxy S8, but you’ll get the same software controls and customization options on the Galaxy S9. When you swipe down twice, you’ll get more options and see 3-dots at the top. This is where you’ll start with customization.
- Pull Down Notification Bar, Swipe down a second time to expand it
- Tap the 3-dot Settings Button
- Select Button Order or Button Grid
- Customize your grid size or the order of the quick settings by dragging and dropping the icons
- Hit Done to finish
After you tap the three dots the first option is button order. From here, you can move the quick settings and options you use the most to the front. That way you don’t have to constantly swipe down twice to see the icon you want to interact with. I have WiFi, Bluetooth, and things I use the most at the beginning. Just press, hold and drag the icons to where you want them.
Or, tap “Grid” to change the number of apps and settings you see on the screen. Owners can choose between 3×3, 4×3 or 5×3.

By choosing something like 5×3 you’ll have more options and controls available at your fingertips. Not only will you see more, but the ones you need are easier to find and use. Keep in mind that there’s no way to remove the persistent brightness slider, but you can move it to the top of the bottom. Also, you can dismiss the WiFi notification, but it will return later.
Other Customization
Additionally, there are a few other steps owners can take to personalize the notification bar area. Including the font size, clock, add a battery percentage number, or even different colors.
To change some of this head to Settings > Wallpaper and themes > and choose a new theme. Most themes will completely change the color of the notification bar, quick settings, and other aspects of your device. Similar to what you saw in our hands-on video above or the screenshot below.

Next, go to Settings > Display > Status Bar and add a battery percentage if you’d like. Or, you can set your phone to show recent notifications only. That way you don’t have 5-6 icons at the top of your screen. This just keeps things clean and organized by limiting it to three.
And finally, navigate to Settings > Display > Screen Zoom and Font to make changes to the size of text or icons. You can change your font, style, icons, the size of the text, and even the overall scale and size of content on your screen.
All of these options combined will give you an improved and more personalized experience on your Galaxy S9. While you’re here, learn how to change the lockscreen and wallpaper, or how to use the Blue Light filter. Enjoy your more personalized Galaxy S9, and drop a comment below with any questions or concerns.